Most people will agree that migrating your website can be challenging.
Or is it really?
At WebsiteMKR we try to make the move over as easy as possible.
If your previous web host uses cPanel our support team will move your account over free of charge within the first 30 days.
But what about those moving from a web host that doesn’t have cPanel?
We see this happen quite often actually and we do offer a migration service for a low fee.
However, if you’d rather manually move your WordPress website over, the process isn’t as hard as you may think.
WordPress File Structure
WordPress comes in two pieces:
- System Files
- Database
The system files are the core components of WordPress and are what make your website actually function.
Besides your custom themes, plugins, and configuration files (including .htaccess), the core WordPress files are the same for every website.
The database is where all of the data inside your WordPress is stored. While all WordPress installations share the same database structure, the data inside is unique to every website.
This includes website customization, posts, pages, theme settings, plugin data, users, etc.
There are 2 ways to migrate your WordPress website manually. With the first method you do not have to reinstall WordPress in the new web hosting. With the second method, reinstalling WordPress will save you time and allow you to skip other steps. Many prefer the second method. Check them both and decide what works best for you.
METHOD 1: WITHOUT INSTALLING WORDPRESS TO THE NEW HOST
Step 1 – Download The Files At Your Current Host
As long as you’re running the self-hosted version of WordPress (and not WordPress.com hosted), your web host will provide you with FTP access to be able to navigate through your files.
The first step to migrating over to a new web host includes downloading all of your current files.
Even though all WordPress installations share the same core files, it’s important you download everything to ensure you’re migrating over to the same version and bring along with you your custom theme, plugins, and media files.
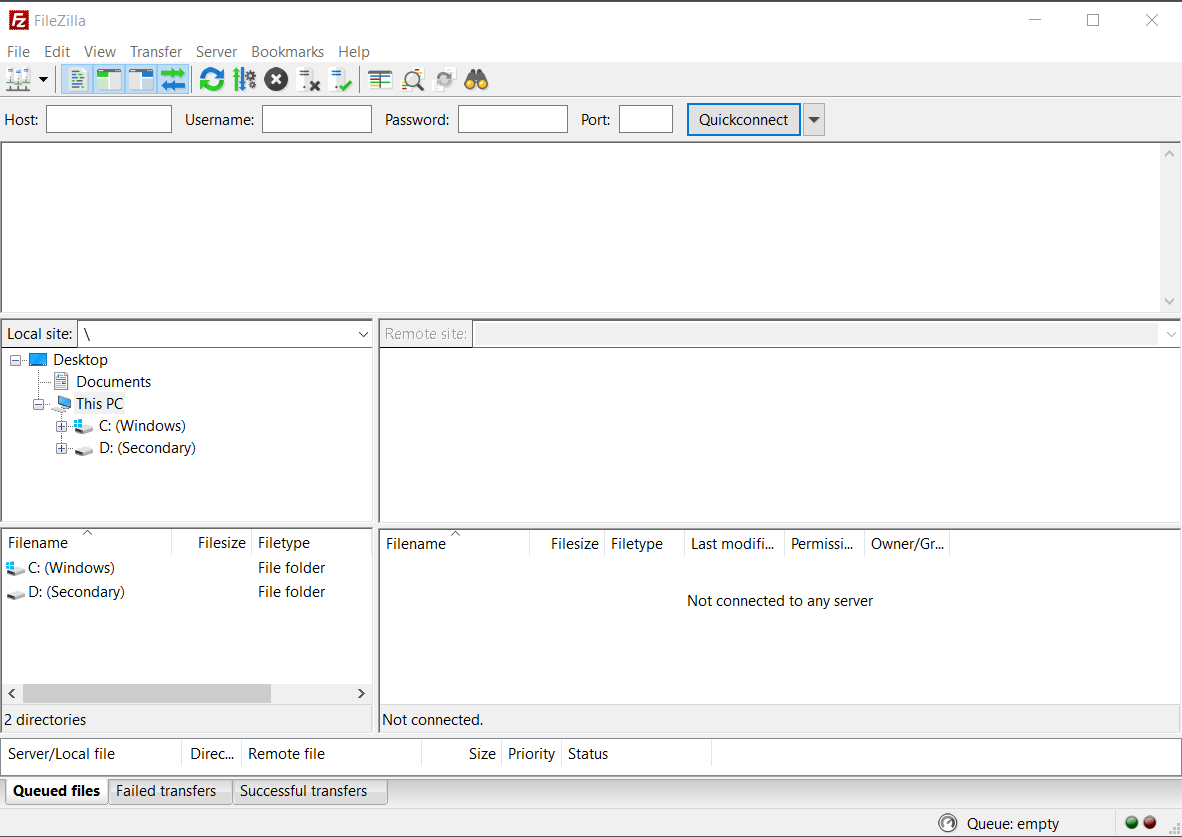
Your current host should provide you with FTP information to get your files. You can then use the free FTP program Filezilla to login and download them to your computer:
Once you have all the files on your computer, it’s then time to grab your current database.
Step 2 – Download Your Current Database
Most all web hosts provide access to the phpMyAdmin GUI to manage your mySQL databases. If your current web host is running cPanel this can be found inside of there.
If they don’t offer cPanel or phpMyAdmin, ask their support team to send you a backup of the WordPress database. You can find this inside your wp-config.php file.
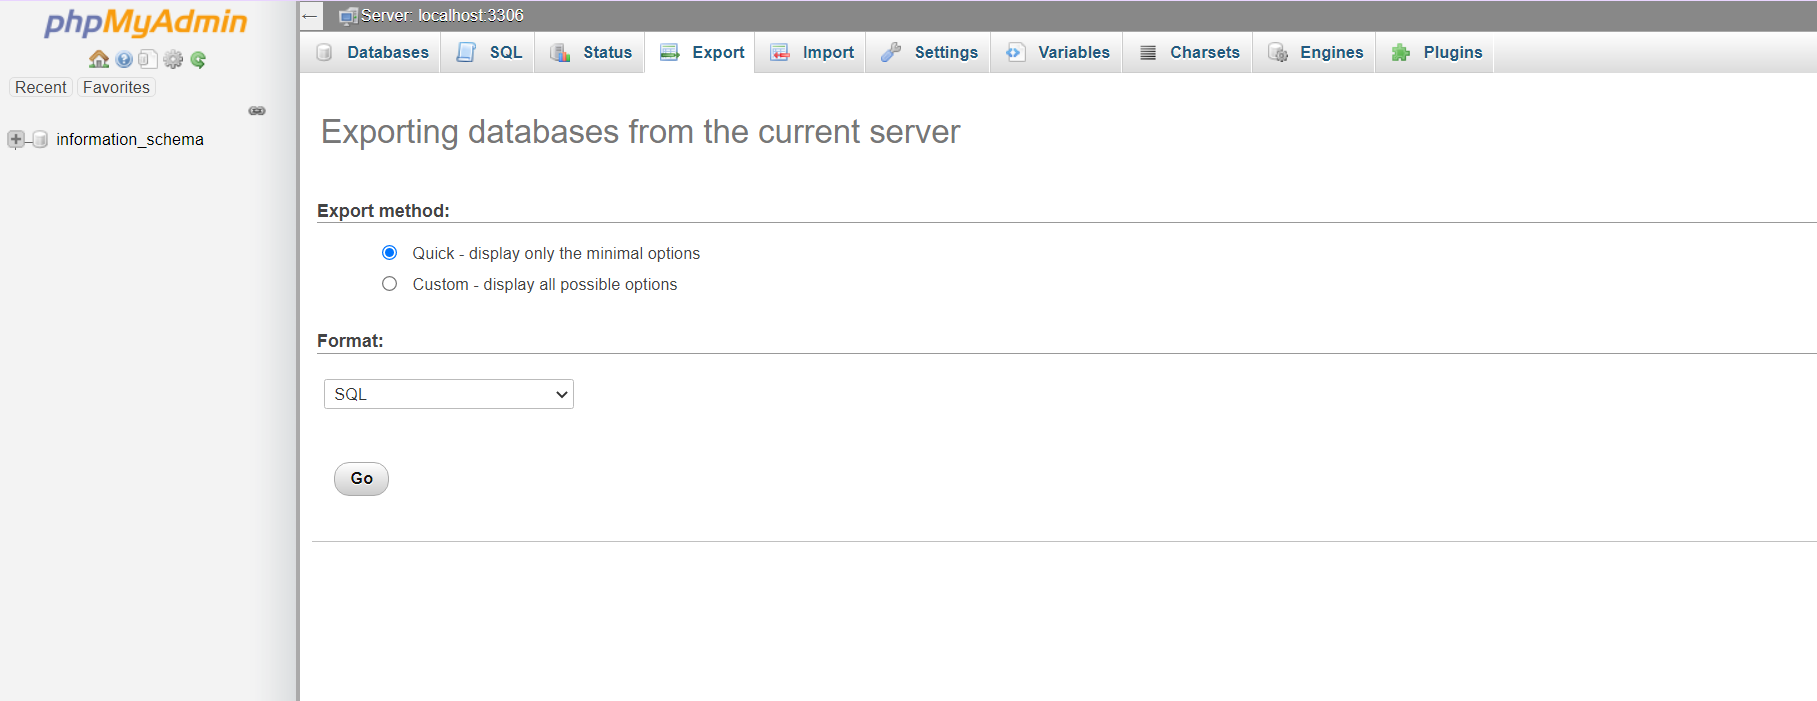
Once inside of phpMyAdmin, select the database on the left, then click Export at the top. Keep the values untouched and click Go to download to your computer:
Once you have the database on your computer, congratulations you’re now ready to re-import to WebsiteMKR (or your new web host).
Step 3 – Upload Your WordPress Files
Just like step 1, you’re going to use Filezilla, but this time connect to your new hosting account. You can use the default cPanel username/password to connect to FTP or create a new FTP account inside of cPanel.
Once you’re connected, you then want to take the files you originally downloaded in Step 1 and upload them.
When the files are all uploaded to your new account, you then want to import the database.
Step 4- Import Your Database
The first thing you want to do is create the database inside of WebsiteMKR.
You accomplish this by going to cPanel -> mySQL Databases -> Create New Database:
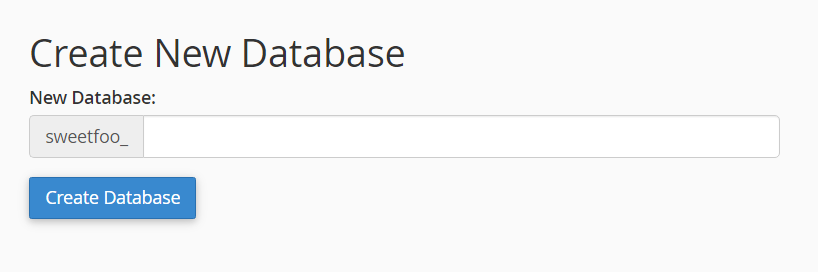
Make sure to note the new database name. Personally, I open my text editor on my computer and paste the name inside.
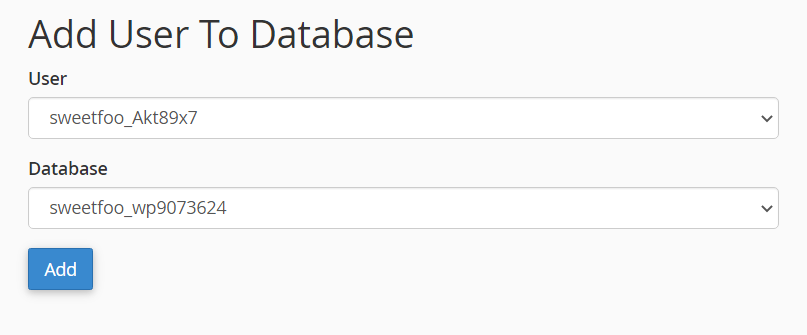
You then want to create a user for the database and assign a strong password:
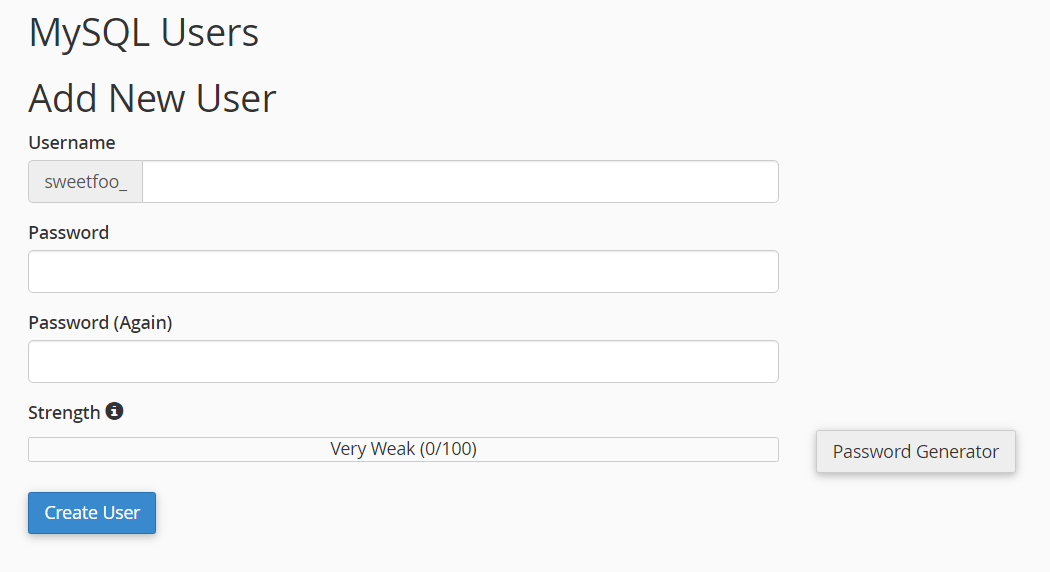
Finally, you want to add the new database user to the new database and assign ALL PRIVILEGES:
When this is completed, you’re ready to import the database backup.
Go to cPanel (or your control panel, depending on your web hosting platform) -> phpMyAdmin. Click on the database you created on the left and then the import button at the top:
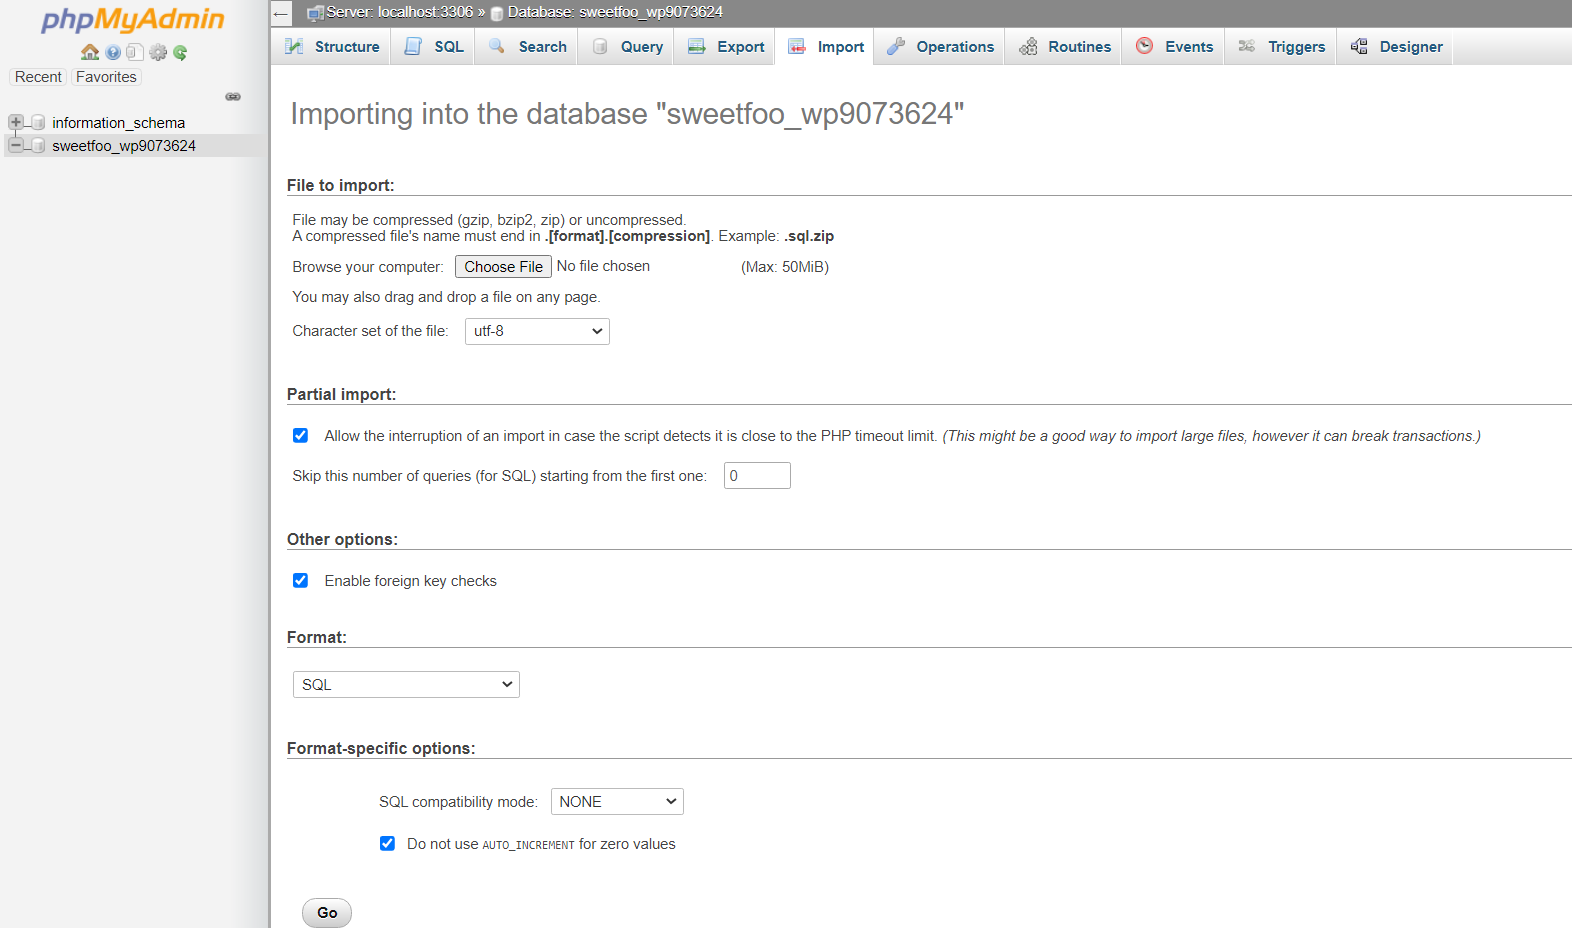
You’ll use the “Choose File” option to find the database on your computer. Please note if it is larger than 50MB you’ll need to compress the file on your computer and try it as a .zip file. If it’s still to large, please submit a ticket to our administration team to manually import it using SSH.
Step 5 – Reconfigure Your wp-config.php File
The final step is to re-configure the values inside your wp-config.php file.
You can access this by going to cPanel -> File Manager -> Navigating to WordPress directory -> Editing wp-config.php:
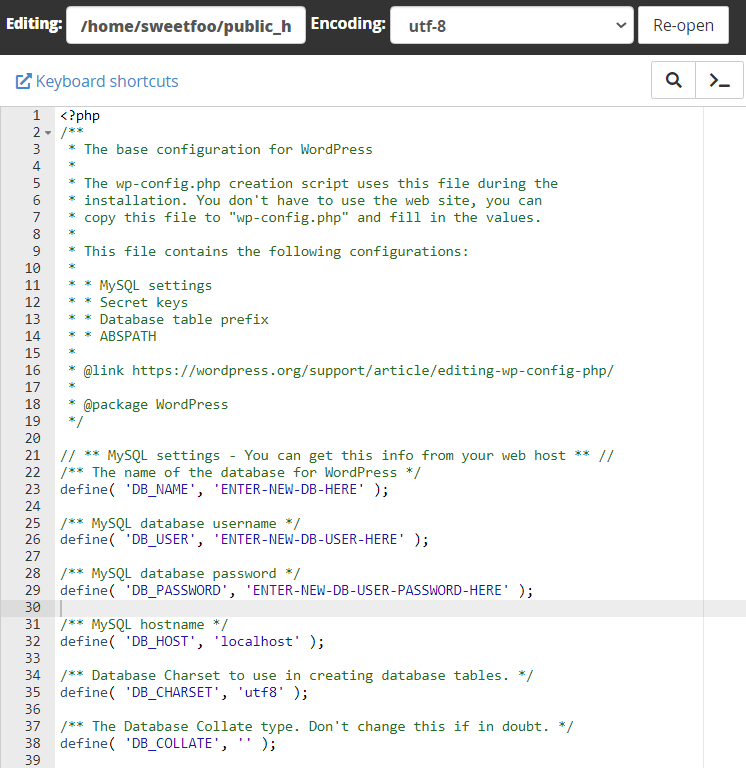
You’ll also want to make sure ‘localhost’ is used in the DB_HOST value (some web hosts such as GoDaddy will use an IP).
Congratulations! At this point your WordPress website should now live on WebsiteMKR’s servers and you should be able to change your name servers over.
The process to change your nameserver will depend on where you have your domain registered. You can check "how to modify your site's Nameservers" if you want to see how it is done when your domain is registered with WebsiteMKR.
You can use the “preview link” sent in your welcome email to verify everything is working correctly. You can also Test or Preview your Website before Changing DNS.
METHOD 2: INSTALLING A NEW WORDPRESS TO THE NEW HOST
This second method is considered by many much easier than the first one since you do not have to create the database and database user.
Step 1 – Download The Files At Your Current Host
As long as you’re running the self-hosted version of WordPress (and not WordPress.com hosted), your web host will provide you with FTP access to be able to navigate through your files.
The first step to migrating over to a new web host includes downloading all of your current files.
Even though all WordPress installations share the same core files, it’s important you download the folder called "Public_html" to ensure you’re migrating over to the same version and bring along with you your custom theme, plugins, and media files.
Your current host should provide you with FTP information to get your files. You can then use the free FTP program Filezilla to login and download them to your computer:
Note: If you do not have a FTP Account you could access the Public-html through the File Manager. The file Manager can be access easily via cPanel -> File Manager. Once in the file manage you will need to compress the Public_html folder to a .zip file and then download it to your computer.
Once you have all the files on your computer, it’s then time to grab your current database.
Step 2 – Download Your Current Database
Most all web hosts provide access to the phpMyAdmin GUI to manage your mySQL databases. If your current web host is running cPanel this can be found there.
cPanel -> phpMyAdmin
If they don’t offer cPanel or phpMyAdmin, ask their support team to send you a backup of the WordPress database. You can find this inside your wp-config.php file.
Once inside of phpMyAdmin, select the database on the left, then click Export at the top. Keep the values untouched and click Go to download to your computer:
Once you have the database on your computer, congratulations you’re now ready to re-import to WebsiteMKR (or your new web host).
Step 3 – Install a New Version of WordPress with your new Web Host
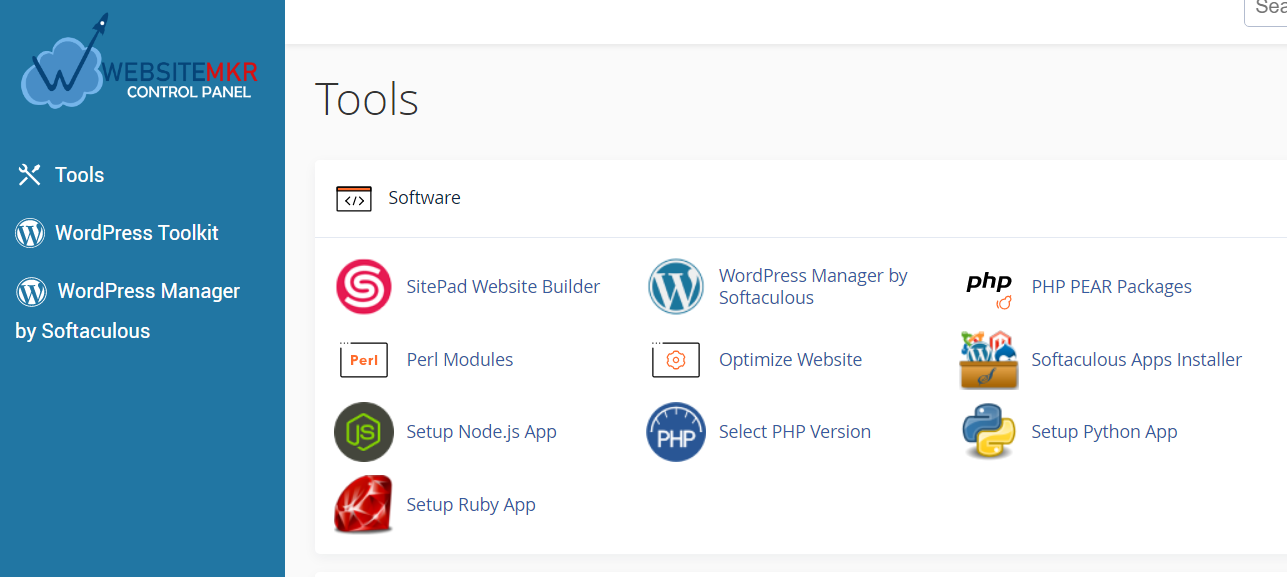
If you are using WebsiteMKR or any platform with cPanel, just go to cPanel and click on "WordPress Manager by Softaculous"
(Note that if your web hosting is not using cPanel, the process will be very similar. Your control Panel would have a WordPress installation feature. Just click on it and follow the steps.)
Once you click on "WordPress Manager by Softaculous" you will be invited to install WordPress. Click on install.

On the installation page, make sure to leave the "Directory" section empty. If you add anything there it might create issues later on.
The admin username and Admin password that you will set here are totally irrelevant. Add anything in those section and click on Quick Install.
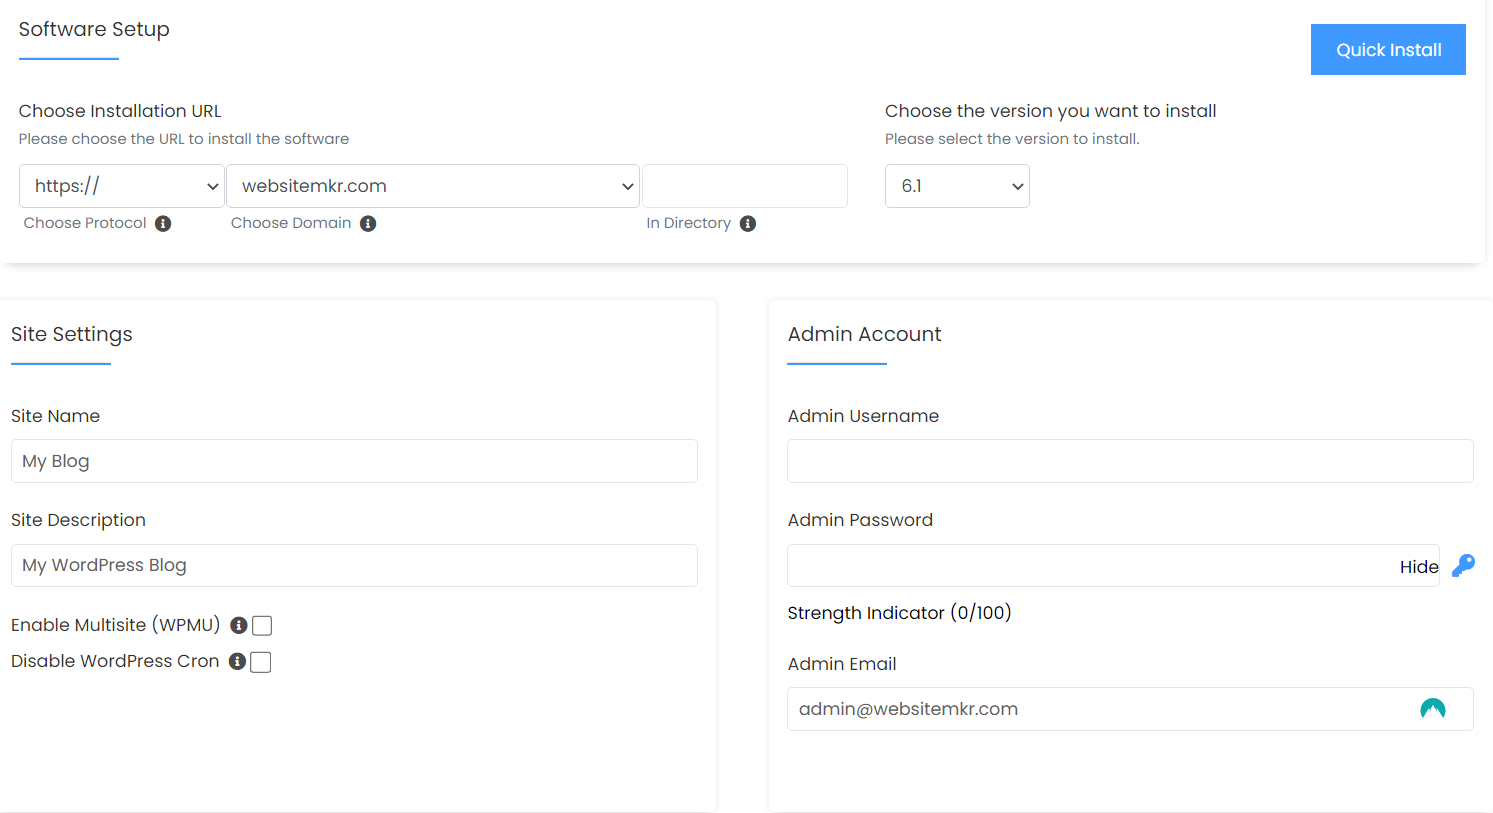
Follow the steps on the screen and you now have a brand new installation of wordpress.
Now, the next step is to add all your content and database to this new installation.
Step 4 – Replace the Public_html folder
Just like step 1, you’re going to use Filezilla, but this time connect to your new hosting account. You can use the default cPanel username/password to connect to FTP or create a new FTP account inside of cPanel.
Once you’re connected, you then want to remove the Public_html folder from the new WordPress installation and take the folder you originally downloaded in Step 1 and upload it.
IMPORTANT: Before deleting the new Public_html folder, save a copy of the file called "wp-config.php". This is the only file that you need to keep.
NOTE: If you do not have a FTP Account, you could access the File Manage to delete the Public-html folder from the new WordPress installation, and then upload the old one.
The file Manager can be access easily via cPanel -> File Manager.
Please note that in order to upload the Public_html from the old WordPress, you will need to compress that folder to a zip file first. Upload it to the New WordPress and then extract it.
IMPORTANT: Once the files are all uploaded, go into the Public_html folder, and replace the file called wp-config.php by the wp-config.php file that you just saved previously.
When the files are all uploaded to your new account, you then want to import the database.
Step 5- Import Your Database
Since you have a brand new WordPress installation you will not need to create a new database. We will use the existing one.
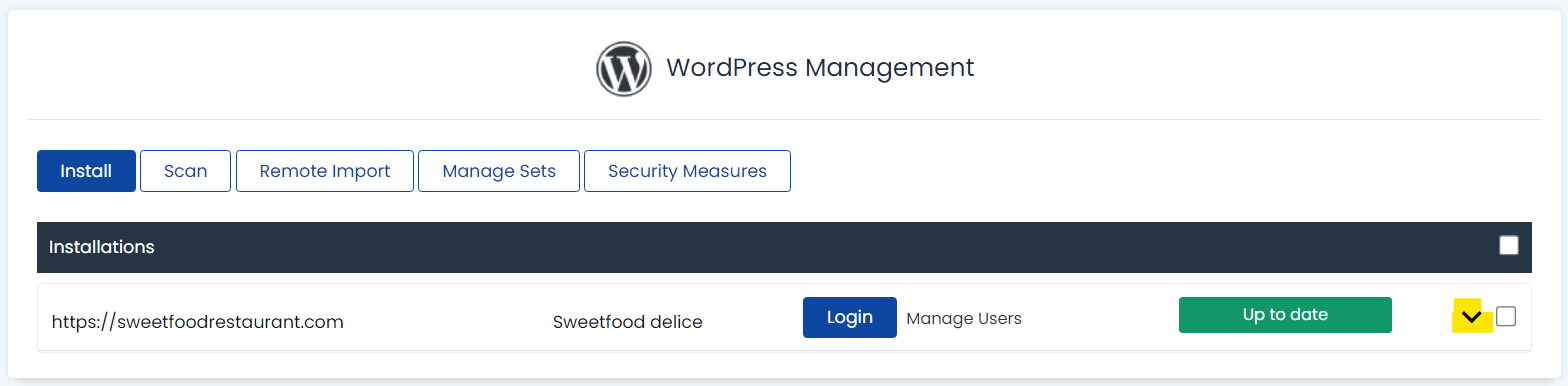
First let's identify the database name. In the cPanel click on "WordPress Manager by Softaculous"
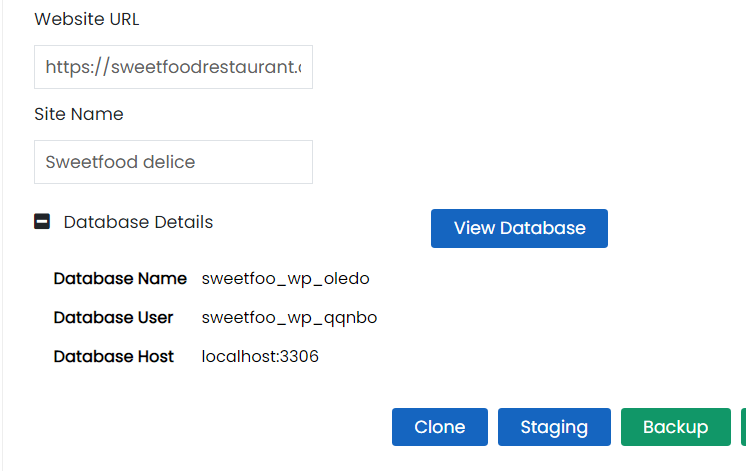
Once in the Wordpress management page, just click on drop down arrow on the right side of your screen to display your wordpress installation information.
Scroll down and locate the Database information.
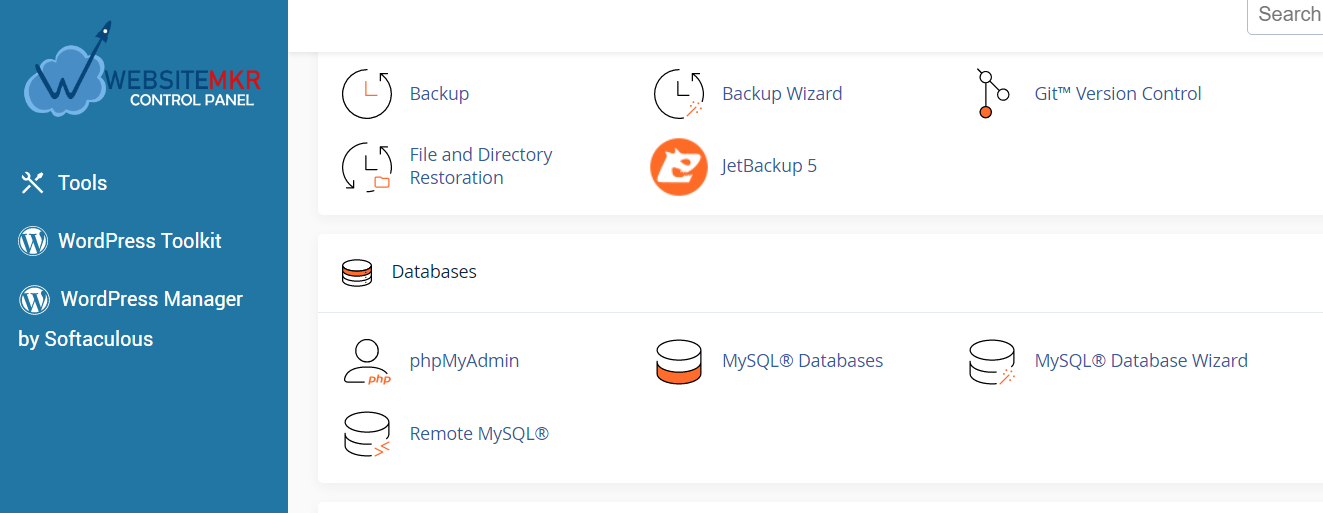
Once you have identified the information to go back to the cPanel main page and click on phpMyAdmin.
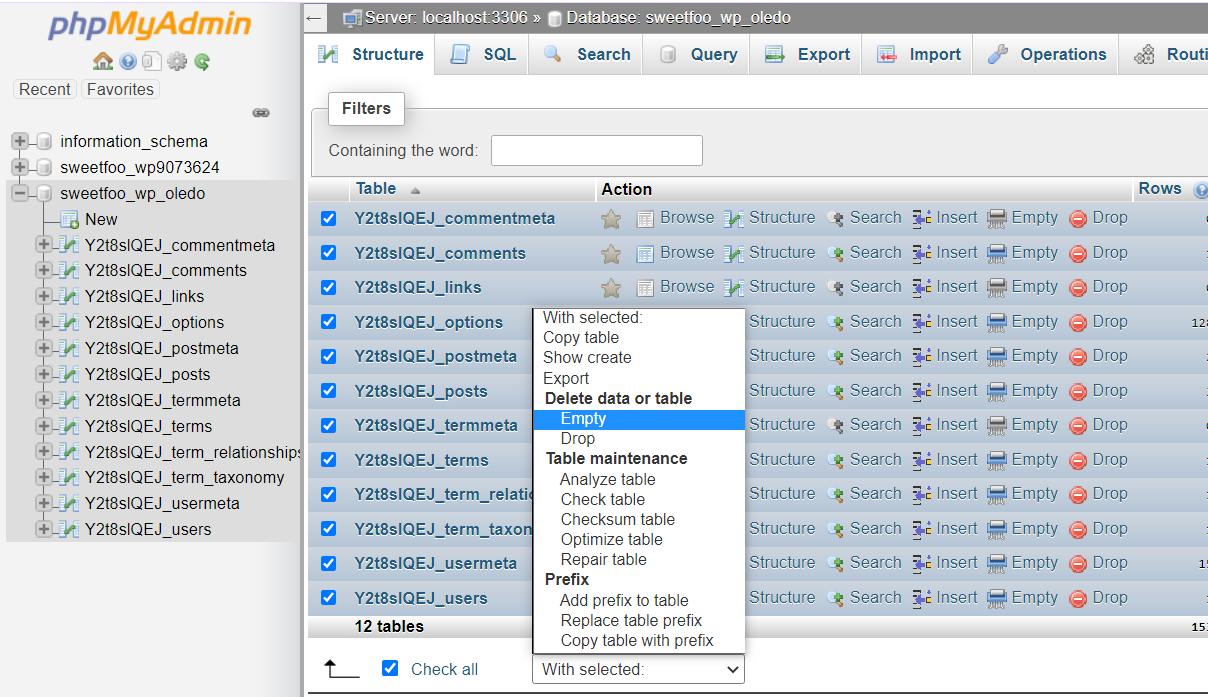
In phpMyAdmin, select the correct database name, click on check all to select all the items within the database and select Empty (as shown on the picture) to delete all the items.
Once the database is empty, click on "Import" on the top part of the screen.
Under File to import, click on "Choose File". You will then select the file that you had saved on step 2.
Please note that prior to selecting the file you will need to compress that file into a .zip file first.
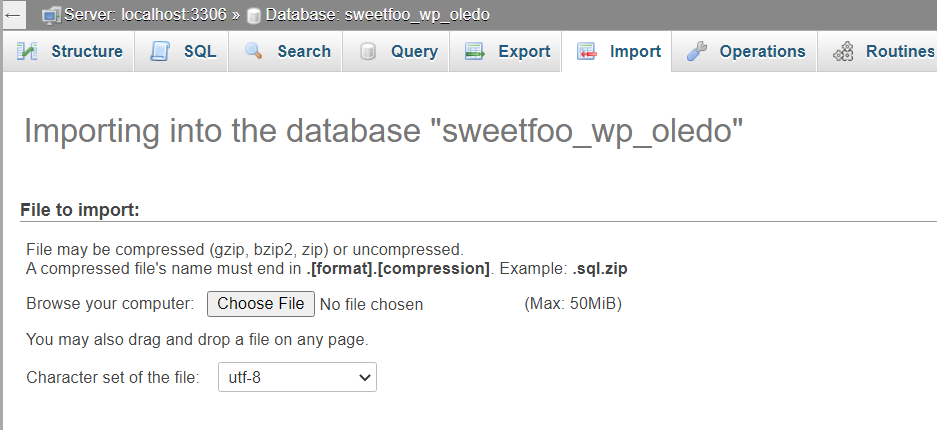
Then click on GO to import the database.
You now have your old database into your new WordPress installation.
Your Wordpress installation should be now up and running including your previous admin name and password as well as all your WordPress users.
Note regarding wp-config.php File
Please note that in this scenario you do not have to edit the wp-config.php file. Since it is a brand new installation, all the information in the wp-config.php file already match the new database name, users and password.
Congratulations! At this point your WordPress website should now live on WebsiteMKR’s servers and you should be able to change your name servers over.
The process to change your nameserver will depend on where you have your domain registered. You can check "how to modify your site's Nameservers" if you want to see how it is done when your domain is registered with WebsiteMKR.
You can use the “preview link” sent in your welcome email to verify everything is working correctly. You can also Test or Preview your Website before Changing DNS.
If you have any questions, feel free to comment below!
In addition, if you’d like our team to manually move your WordPress website, submit a new ticket with your current host’s FTP/phpMyAdmin credentials and we can provide a quote for our team to do it for you!
